ESPHome height-adjustable desk controller
During Corona I bought an electrically height-adjustable desk. Back then I created a small ESPHome based project that allows controlling the desk using keyboard shortcuts without modifying the controller. I have been using it almost daily since then, but never finished the writeup. Better late than never.
The inconvenience#
Usability-wise the biggest gripe I had with the desk, a ROL ERGO GF-470, is that as a basic model it requires you to keep the movement buttons pressed until the desk is at the right height. Instead I wanted to be able to use a keyboard shortcut on my computer to switch between my standing and sitting position.
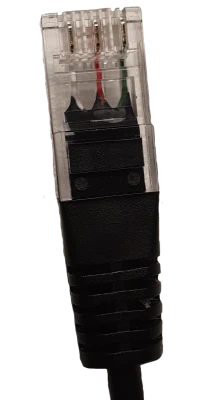
Inspecting the controller#
The first step towards that goal was to inspect the desk’s electronics to identify what we have to work with.
The control panel connects to the control box using RJ45 plugs. Only three wires are connected:
| Pin | Color |
|---|---|
| 2 | White |
| 5 | Red |
| 8 | Green |
Probing them we see the following:
- Pressing the up arrow button connects pin 5 to 8
- Pressing the down arrow button connects pin 2 to 8
There is a 5V potential between the pins.
Looking at the pinout for the corresponding socket on the PCB this makes sense:
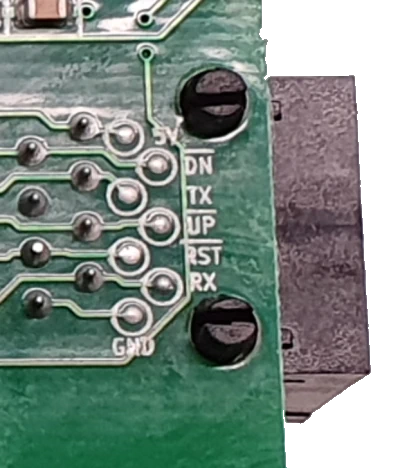
| Pin | Marking |
|---|---|
| 1 | 5V |
| 2 | DN |
| 3 | TX |
| 4 | NC |
| 5 | UP |
| 6 | RST |
| 7 | RX |
| 8 | GND |
Seeing an RX/TX serial port pair on the connector was intriguing. Unfortunately I could not find a way to get the controller to react or transmit on the port. I assume it is only used in more expensive versions of the product. In those the control panel can store positions and display the height of the desk.
There is also an exposed PIC ICSP header reachable through a cutout visible via its silk screen markings:
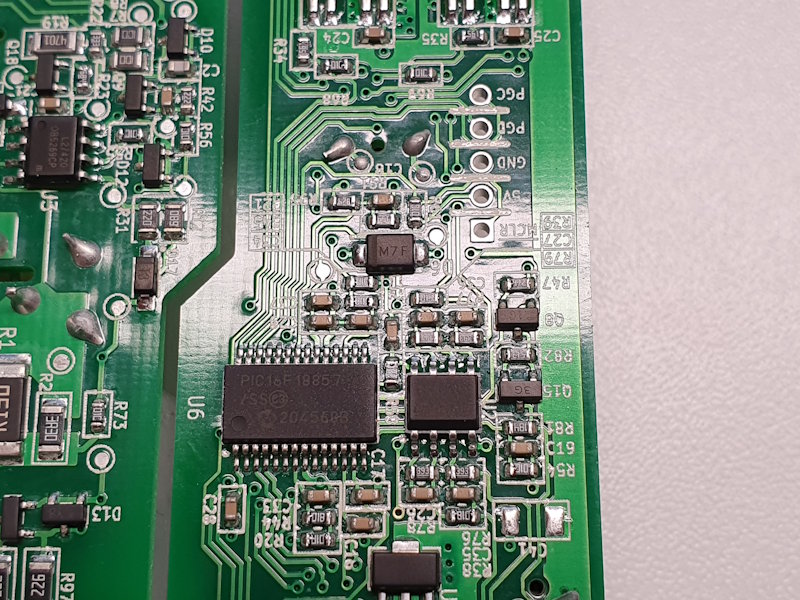
| Pin | Marking |
|---|---|
| 1 | MCLR |
| 2 | 5V |
| 3 | GND |
| 4 | PGD |
| 5 | PGC |
It connects to a PIC16F18857 controller. If code protection is not enabled it would be possible to dump the chip and to inspect the firmware for serial-related functionality. Another option would be to erase the chip and reprogram it with a custom firmware to replace the original one.
Selecting the approach#
Based on the information gained so far, moving the desk up and down is easily possible by interfacing with the RJ45 cable interface to the control panel. But how would it know when to stop? I was already eyeing buying a PICkit in-circuit debugger/programmer to attempt to read the chip when I realized my goal could be reached much simpler. With my day ruined by my reason for buying more kit evaporating I decided to actually KISS for once:
Even this basic model of the desk controller allows you to define end stops for a lower and an upper position. This means moving up and down is all we need. One minor wrinkle is that if after reaching the stop the direction is held for another five seconds the stop is overridden. In practice this is no big problem. If we only switch between high and low position we can estimate the movement time quite precisely and the five seconds gives a good buffer.
Proof-of-concept#
I quickly threw together a proof of concept with components I already had on a breadboard:
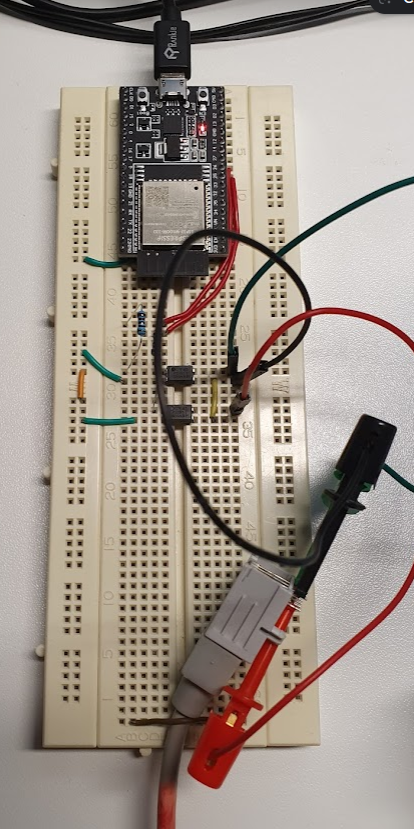
Here is the schematic:

I used the ESP32-DevKitC V4 (ESP32-WROOM-32U) because I had it handy at that time. If you want to build your own the ESP32-C3 SuperMini is more compact, cheaper and has a USB-C connector. The two pins we use can be freely chosen and any GPIO will do.
The PC817 optocoupler is another part I find handy to have around. Here one is used for each button. The advantage of using an optocoupler is that we are completely electrically isolated from the desk electronics. We really only emulate the button. I used a 1kOhm resistor which should give about 2.1mA of forward current for the optocoupler which is good enough in this application to make the “button” reliable.
The circuit diagram already contains a second RJ45 connector to turn this into a pass-through device but that will be described in more detail in the final build.
ESPHome setup#
Now that we have the hardware we need the software part. For this I chose to use ESPHome which allows you to “Turn your ESP32, ESP8266, or RP2040 boards into powerful smart home devices with simple YAML configuration”. We all love YAML, right?
Anyways. With ESPHome it is extremely simple to create IoT devices that seamlessly integrate into Home Assistant but also can work stand-alone on your network if required.
esphome:
  name: esphome-desk

esp32:
  board: esp32dev

# Only log errors
logger:
  level: ERROR

# Enable api for homeassistant integration
api:
  encryption:
    key: !secret api_encryption_key

# Enable over-the-air upgrades
ota:
  platform: esphome
  password: !secret ota_password

# Connect to specified wifi
wifi:
  ssid: !secret wifi_ssid
  password: !secret wifi_password

# Enable built-in web-server with control panel. Also has web endpoints to control the device without having to talk to homeassistant.
web_server:

# Configure virtual up/down switches
switch:
  - platform: gpio
    pin: GPIO27
    id: desk_down
    name: "Down"
    icon: "mdi:arrow-down-bold"
    interlock: desk_up
    on_turn_on:
      - delay: 15s
      - switch.turn_off: desk_down
  - platform: gpio
    pin: GPIO26
    id: desk_up
    name: "Up"
    icon: "mdi:arrow-up-bold"
    interlock: desk_down
    on_turn_on:
      - delay: 15s
      - switch.turn_off: desk_up
Most of this is boilerplate for basic setup. For the actual behavior the ESPHome switch component does everything we want already. We simply add an up and a down switch associated with the right pins on our controller. Each switch is set up to turn itself off 15s after it has been activated which is the time my desk needs to move between positions. Setting up an interlock between the switches makes them mutually exclusive to prevent us from accidentally triggering both at the same time.
I also experimented with adding a VL53L0X time-of-flight sensor to the setup in the hopes of getting exact positioning this way. This worked great for reading the height and tracking when the desk is in sitting or standing position. However, at least naively integrated with ESPHome, it was much too slow for real-time control. I decided to stick with the fixed timer. If someone wants the few additional YAML lines required for the height tracking let me know.
That is all there is to it software-wise.
Final build#
For the actual build I was lucky in that not long before I did some home network improvements. From that I remembered seeing this on Amazon:
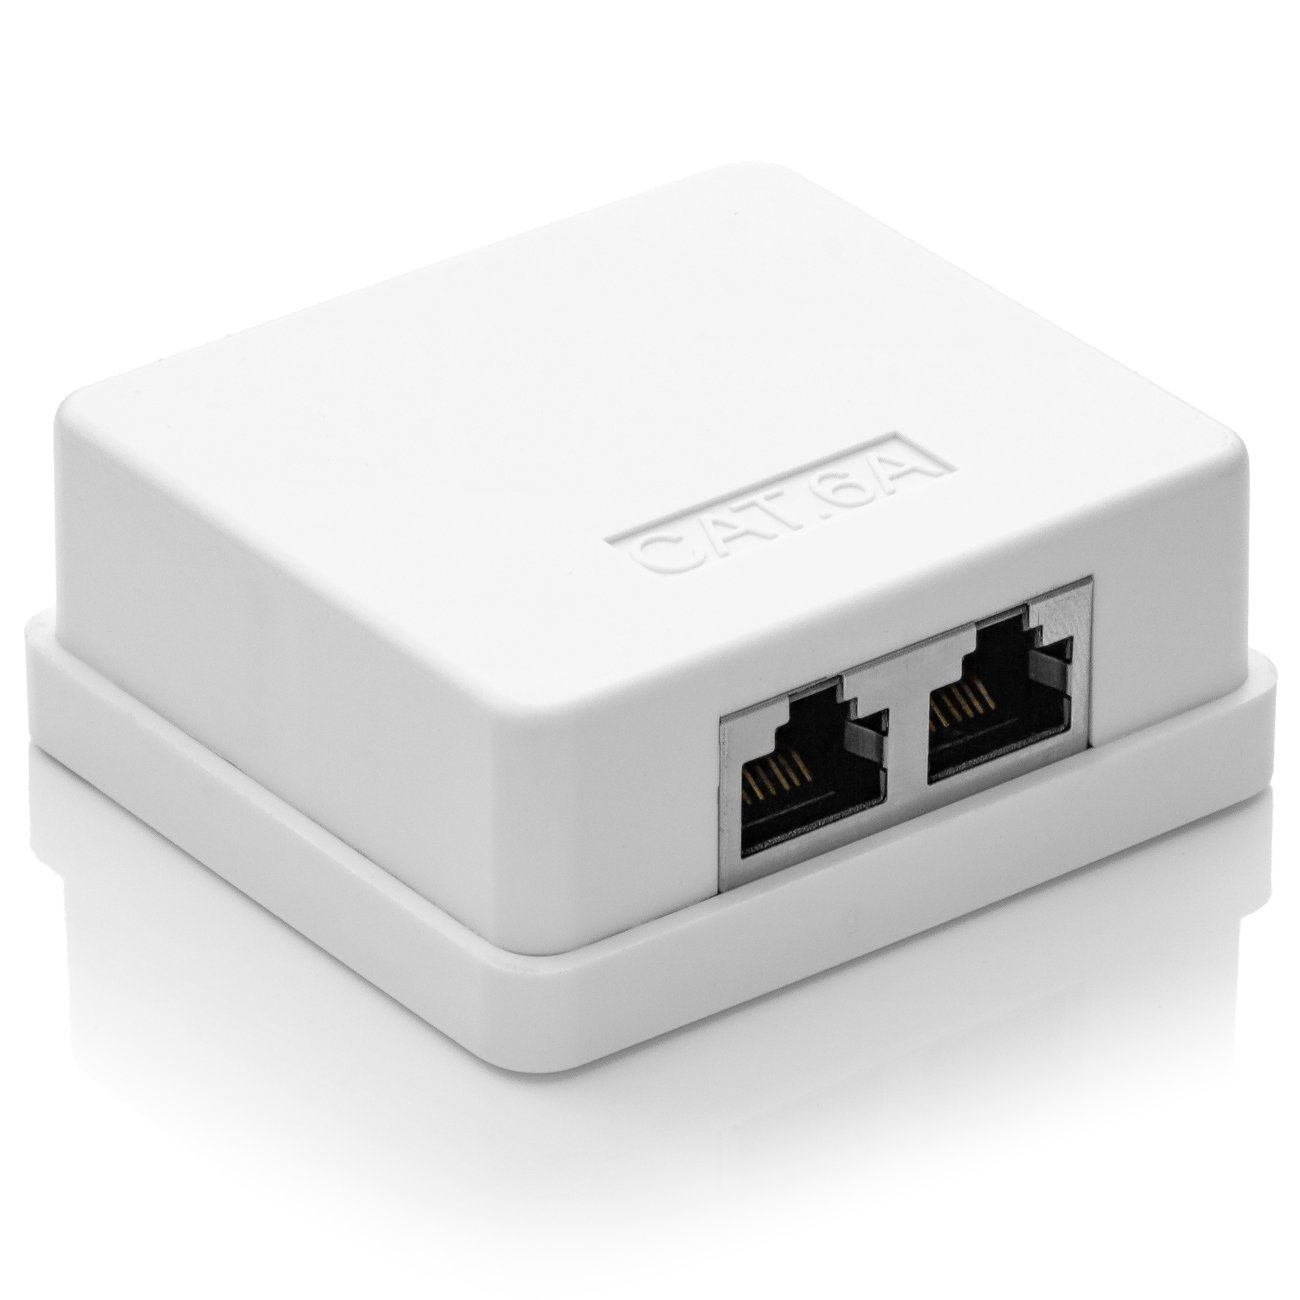
A cheap two port surface mount network outlet. The inside looks like this:
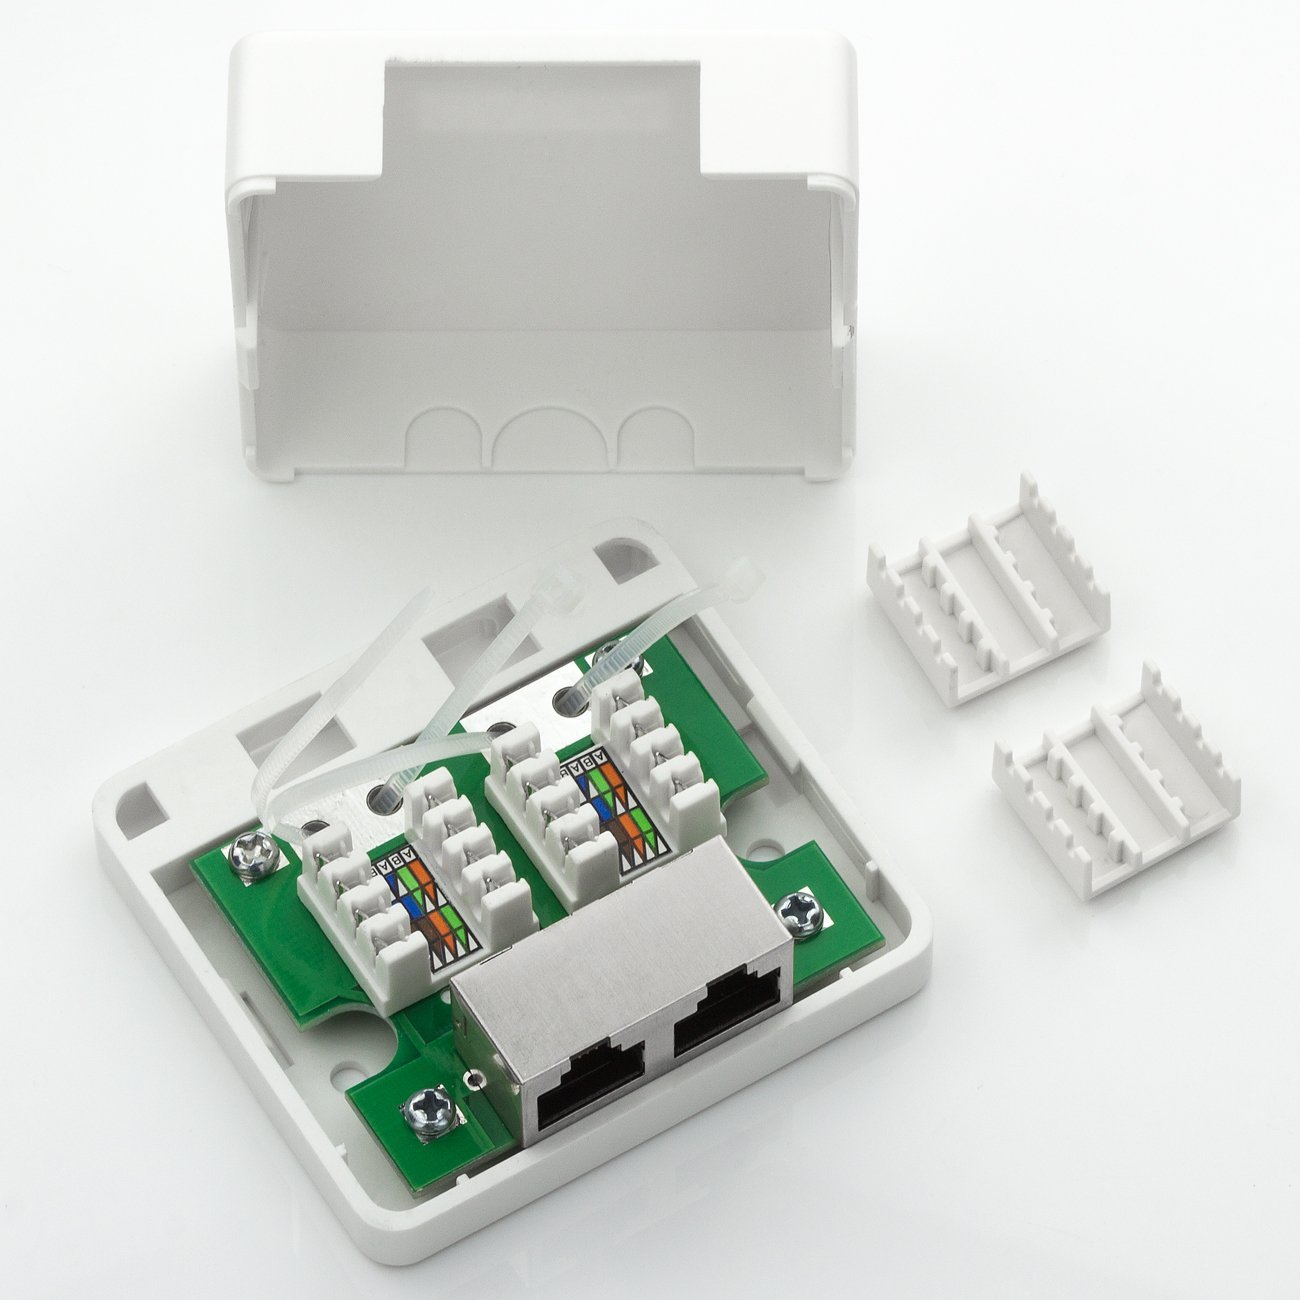
Turns out that is sufficient space to fit the circuit. The punch-down connectors even made wiring simpler:

For the two PC817s and their resistors I used a small piece of perfboard. The wiring is solid copper core telephone wire punched down to provide a pass-through for the three wires of the desk control panel as well as connecting it to the optocouplers.

It is a tight fit but a fit it is. The only actual modification required for the case was to create a cutout for the USB used to power the controller. With that the case snaps shut and the device is ready for use.

I used double-sided tape to stick it to the underside of my desk, plugged the control panel in one port and used a short RJ45 patch cable to connect the other side to the port on the original desk controller.
Shortcut control#
With the setup as is we can control the desk using Home Assistant, its app and other integrations. But as mentioned in the beginning in day-to-day operation I wanted to be able to use keyboard shortcuts on my computer. The simplest way I know on Windows is AutoHotkey, which lets you trigger scripted behavior when a key combination is pressed. All the following script does is to use the ESPHome provided POST endpoint to toggle the “Up” (/switch/Up/toggle) or “Down” (/switch/Down/toggle) switch respectively:
; Companion AutoHotkey v2 script to
; allow moving the ESPHome attached desk
; using keyboard shortcuts.
;
; Ctrl + Page Up    : Toggle up movement
; Ctrl + Page Down  : Toggle down movement
;

Url := "http://esphome-desk"

DeskSwitch(Id,  Action) {
    whr := ComObject("WinHttp.WinHttpRequest.5.1")
    whr.Open("POST", Url "/switch/" Id "/" Action, False)
    whr.Send()
}

^PgUp::{
    DeskSwitch("up", "toggle")
}

^PgDn::{
    DeskSwitch("down", "toggle")
}
On Linux your desktop environment of choice probably has some way to execute a curl command for a key-combination to achieve the same.
Oh and before someone complains about the unauthenticated HTTP calls: Yes, you can add basic auth if your threat model includes desk-tampering adversaries in your LAN. I decided to accept that risk.
Conclusion#
This was a very straightforward project, but the result is something I have been using almost every day for years now. If you have an electrically height-adjustable desk and find its controls cumbersome I definitely would recommend checking if you can do something similar to this.
Happy desking.